AP Studio Art
  • Current Assignments
  • Course Expectations
  • Resources
  • Galleries
  • Burlington High School Art & Design Program

Graphite Drawing: Hair

10/28/2020

0 Comments

 
Watch the video below (just one of many good demonstrations), then make a refined graphite drawing of your own hair. Draw large, to fill a page of your sketchbook. Draw from life, and use a single light source. Use a full set of pencils and replicate the tonal values exactly as you see them in the real three-dimensional world. 

Make this a finished, refined artwork.

(There are countless other videos about the process on Youtube and time-lapse demonstrations. Look for one or two that show how to address your specific type of hair.)
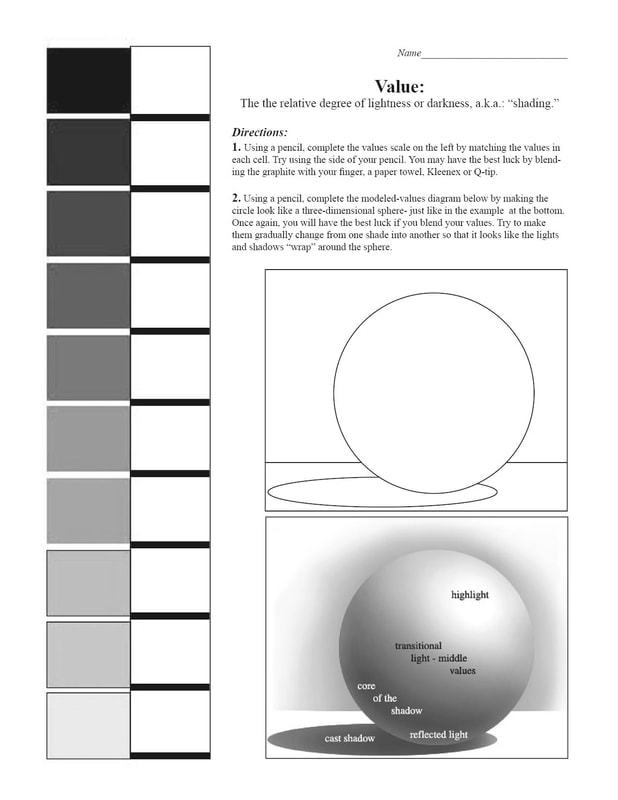
​Remember to use a FULL RANGE OF TONAL VALUE. You may want to practice creating different tonal values first, ​using the scale below. Use H and low B pencils for your lightest tones, 2B and 4B for your middle tones, and 6B for your darkest values.
Picture
0 Comments

Hand(s)

10/27/2020

0 Comments

 
Due: One class period

A graphite (pencil) contour line drawing of your hand, in a gestural pose
  • Entirely from observation (from life; no photographs)
  • DO NOT trace your hand
  • Draw large; fill the page of your sketchbook
  • If you complete the line drawing in class, add tonal value to create three-dimensional form.
  • OR, draw your hand from another angle, with a different gesture.

    Graded on:
  • Accuracy of proportion
  • Accuracy of contour line
0 Comments

Self Portrait in the Style of Rembrandt

10/21/2020

0 Comments

 
Rembrandt van Rijn
1606 - 1669
Dutch (Holland)

See more of Rembrandt's self portraits at rembrandtpainting.net


Get to know the artist:
  • The Metropolitan Museum of Art
  • The National Gallery
Due:
One week
​
Project Description: 
Using oil pastel or another rich color medium, draw a traditional self-portrait in the style of Rembrandt van Rijn.

The room should be rather dark, with a single light source (such as from a small lamp) directed at you to create a good sense of form. Try for dramatic lighting, and a good break-down of light, middle and dark tones. Set yourself up in front of a mirror, with your face turned at a 3/4 angle to the mirror. With a light pencil line (using an HB pencil or lighter), rough out the general proportions of your head, neck and shoulders. Then, block in the shadows with oil pastel, beginning lightly, then gradually blending color upon color and applying more pressure for smoother colors.


Medium: 
  • Oil pastel


Objectives: 
  • Accurately render facial structure and features 
  • Create color harmony 
  • Hone technical skills with the medium 


Grading Criteria: 
  • Likeness 
  • Facial Structure 
  • Light and Form 
  • Color 
  • Craftsmanship 


To Start: 
  • Study portraits by the following artists: Kathe Kollwitz, Vincent Van Gogh, and Rembrandt van Rijn. 
  • Study the human skull. Be aware of the major planar changes. 
  • Study the portraits on display in the Galleries pages of this site.
  • The room should be rather dark, with a single light source (such as from a small lamp) directed at you to create a good sense of form. Try for dramatic lighting, and a good break-down of light, middle and dark tones. Set yourself up in front of a mirror, with your face turned at a 3/4 angle to the mirror. With a light pencil line (using an HB pencil or lighter), rough out the general proportions of your head, neck and shoulders. Then, block in the shadows with oil pastel, beginning lightly, then gradually blending color upon color and applying more pressure for smoother colors.
0 Comments

All-Value-No-Lines Self Portrait

10/15/2020

0 Comments

 
One day

​Using a soft drawing pencil or charcoal, draw as much of your face as possible by only using changes in tonal values. Don't draw any lines. Define your face by roughing in the dark, middle, and light areas rather than by defining the contours. Use the side of your drawing material instead of the tip.
0 Comments

Full Value Self Portrait (3/4 Angle)

10/14/2020

0 Comments

 
Due: One week

Project Description:

Using your Ebony pencil, draw a traditional full-value self-portrait from a 3/4 angle (i.e. with partially turned head so that you can see the side of your nose but both your eyes).

The drawing must include your head, neck, and shoulder, and take up a full page of your sketchbook.

It must be from a mirror, not a photograph.

Use a single light source (such as from a small lamp, or a window) directed at you to create a good sense of three-dimensional form (chiaroscuro). Arrange the light for a good break-down of light, middle and dark tones. Set yourself up in front of a mirror, with your face turned at a 3/4 angle to the mirror. With a light pencil line (using an HB pencil or lighter), rough out the general proportions of your head, neck and shoulders. Then, block in the shadows with darker tones, beginning lightly, then gradually developing and refining the full range of values and gradations, and good contrast.

Medium:
Ebony pencil, or other graphite drawing pencils

Objectives:
  • Accurately render facial structure and features
  • Hone technical skills with the medium

Grading Criteria:
  • Likeness
  • Facial Structure
  • Light and Form (Chiaroscuro)
  • Craftsmanship

To Start:
  • Study portraits by the following artists: Kathe Kollwitz, Vincent Van Gogh, and Rembrandt van Rijn.
  • Study the human skull. Be aware of the major planar changes.
  • Use a single light source (such as from a small lamp, or a window) directed at you to create a good sense of three-dimensional form (chiaroscuro). Arrange the light for a good break-down of light, middle and dark tones. Set yourself up in front of a mirror, with your face turned at a 3/4 angle to the mirror. With a light pencil line (using an HB pencil or lighter), rough out the general proportions of your head, neck and shoulders. Then, block in the shadows with darker tones, beginning lightly, then gradually developing and refining the full range of values and gradations, and good contrast
0 Comments

Facial Features

10/9/2020

0 Comments

 
0 Comments

Blind Contour and Continuous Contour Drawings: Self Portraits

10/8/2020

0 Comments

 
One class period

You will need:
  • Your 11 x 14" sketchbook
  • Mirror
  • Drawing pencil
  • Eraser

Draw the following, each in its own separate page of your sketchbook:
  • Blind contour drawing of your face from straight-on (1)
  • Blind contour drawing of your face from three-quarter angle (1)
  • Continuous contour drawing of your face (1 or 2, depending on time available)
0 Comments

Unit Overview: Portraits

10/7/2020

0 Comments

 
Project:
Using various media, draw a series of self portraits

Objectives:
  • Improve observational accuracy
  • Establish form via chiaroscuro changes
  • Improve your ability to create a rich range of tonal value

Materials:
  • Mirror
  • Drawing paper (white, black), charcoal paper, pastel paper
  • Pencil, charcoal, chalk

Parameters
  • Must include your head, neck, and shoulders. It may include much more.

Grading Criteria:
  • Structure of skull/head
  • Accuracy/likeness
  • Recreation of nuances of line and value

First Drawings:

To start, you will be working on a series of self portrait drawings to be completed in a single class period. Look carefully and closely at yourself in the mirror. Choose a good viewpoint (it does not necessarily have to be straight on), and remain still as your draw. Your focus should be to capture contour and proportion as accurately as you can given the guidelines.


1. Draw a blind contour drawing of yourself. To do this, you must not look at the paper as you draw. Draw to fill the entire paper. Draw slowly and carefully, following the edges of the various forms on your face. If you lose your place, you may stop and look at your drawing to get to set yourself in the right place, then stop looking and continue drawing blindly. If you consider the first drawing unsuccessful, do a second one. Bear in mind, there will likely be a considerable amount of distortion.


2. Draw a continuous contour drawing that includes your head, neck and shoulders (shirt collar, etc.). You can only use one line for the entire drawing. If your pencil accidentally leaves the paper, place it where you left off and continue. Draw to fill the entire paper.


3. Draw one of your features, large (fill the paper). Concentrate on accurate proportion and contour (line) first. Once you are satisfied that your line drawing is accurate, add value (using your ebony pencil, a set of drawing pencils, or a charcoal pencil). Tonal value should be used to establish three-dimensional form, so use light, middle, and dark tones.
0 Comments

    Author

    Write something about yourself. No need to be fancy, just an overview.

    Archives

    June 2025
    October 2023
    October 2022
    September 2022
    November 2021
    October 2021
    September 2021
    May 2021
    April 2021
    March 2021
    January 2021
    December 2020
    November 2020
    October 2020

    Categories

    All

    RSS Feed

Powered by Create your own unique website with customizable templates.